Facing email deliverability issues? Learn how to set up DKIM in HubSpot to confirm the authenticity of your emails, improve deliverability, and safeguard against spoofing with DKIM authentication.
This setup not only enhances email security but also supports streamlined marketing efforts by ensuring your messages consistently reach your audience’s inbox.
Understanding DKIM in HubSpot
What is DKIM?
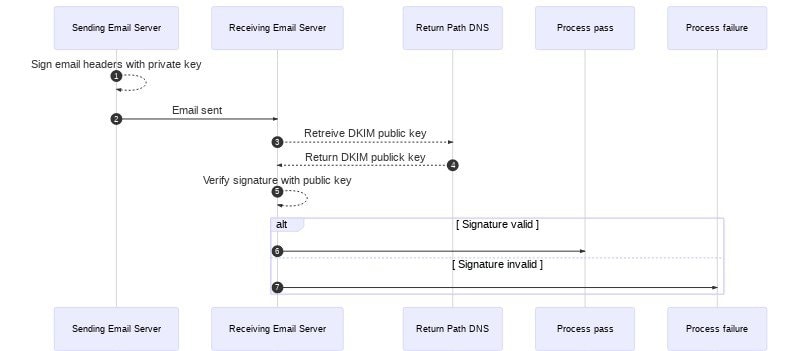
DKIM (DomainKeys Identified Mail) is an email authentication protocol and security standard that helps detect email alterations during transmission. It employs public-key cryptography to sign emails with a private key from the sender's server. The recipient server then verifies the source using a public key published in the DKIM record, ensuring the email's integrity and authenticity.
Once the signature is verified with the public key by the recipient server, the message passes DKIM and is considered authentic.
Why is DKIM Important?
#1 It Confirms Your Legitimacy as a Sender
While DKIM is optional, it enhances your sender reputation, reducing the likelihood of emails landing in spam folders. For a complete security setup, choose the primary domain used for sending email in HubSpot’s settings.
#2 It Helps Build Your Long-Term Reputation
ISPs (Internet Service Providers) such as Google use DKIM to build a domain reputation over time. As you send marketing emails and improve your delivery practices (low spam and bounces, high engagement), your domain builds a good sending reputation with ISPs, which improves email deliverability.
Tip : To increase even more engagement and make the best of your email strategies, explore our tutorial on HubSpot Sequences vs Workflows, and make sure your sales team have set up the HubSpot LinkedIn integration.
The Role of DKIM in Preventing Email Spoofing
Email spoofing is a technique used by cybercriminals to fake the source of an email, making recipients believe it’s from a trusted sender when it’s not.
DKIM combats this by adding an encrypted header to emails, enabling recipients to confirm the email's origin and integrity. For the most effective security, DKIM is best used with SPF and DMARC:
- SPF (Sender Policy Framework): Validates the sender’s IP.
- DMARC (Domain-based Message Authentication, Reporting, and Conformance): Aligns DKIM and SPF records, guiding the receiving server on handling unauthenticated emails.
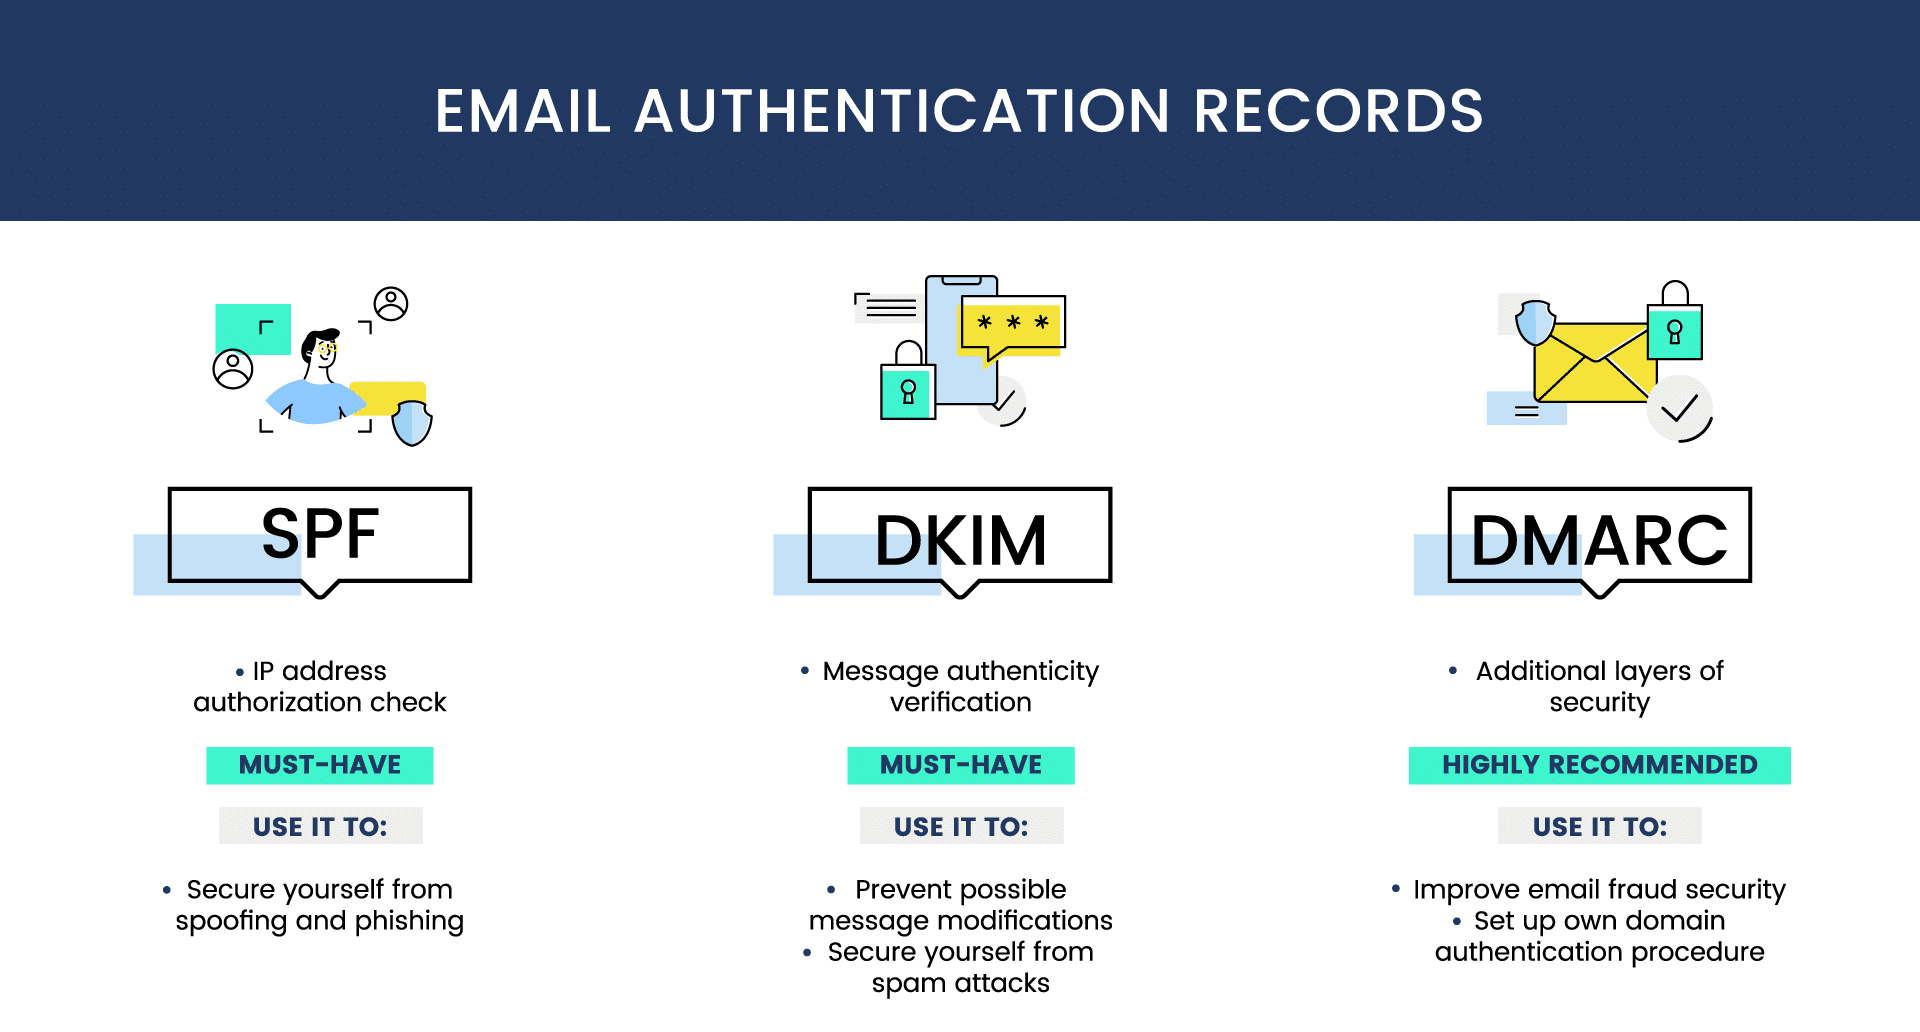
Together, DKIM, SPF, and DMARC protocols create a robust defense against spoofing.
Step-by-Step Guide to Set Up DKIM in HubSpot
Setting up DKIM in your HubSpot account might seem challenging, but it's straightforward.
Here is how to connect your email sending domain and configure DKIM for secure email authentication in HubSpot:
#1 Connect Your Email Sending Domain
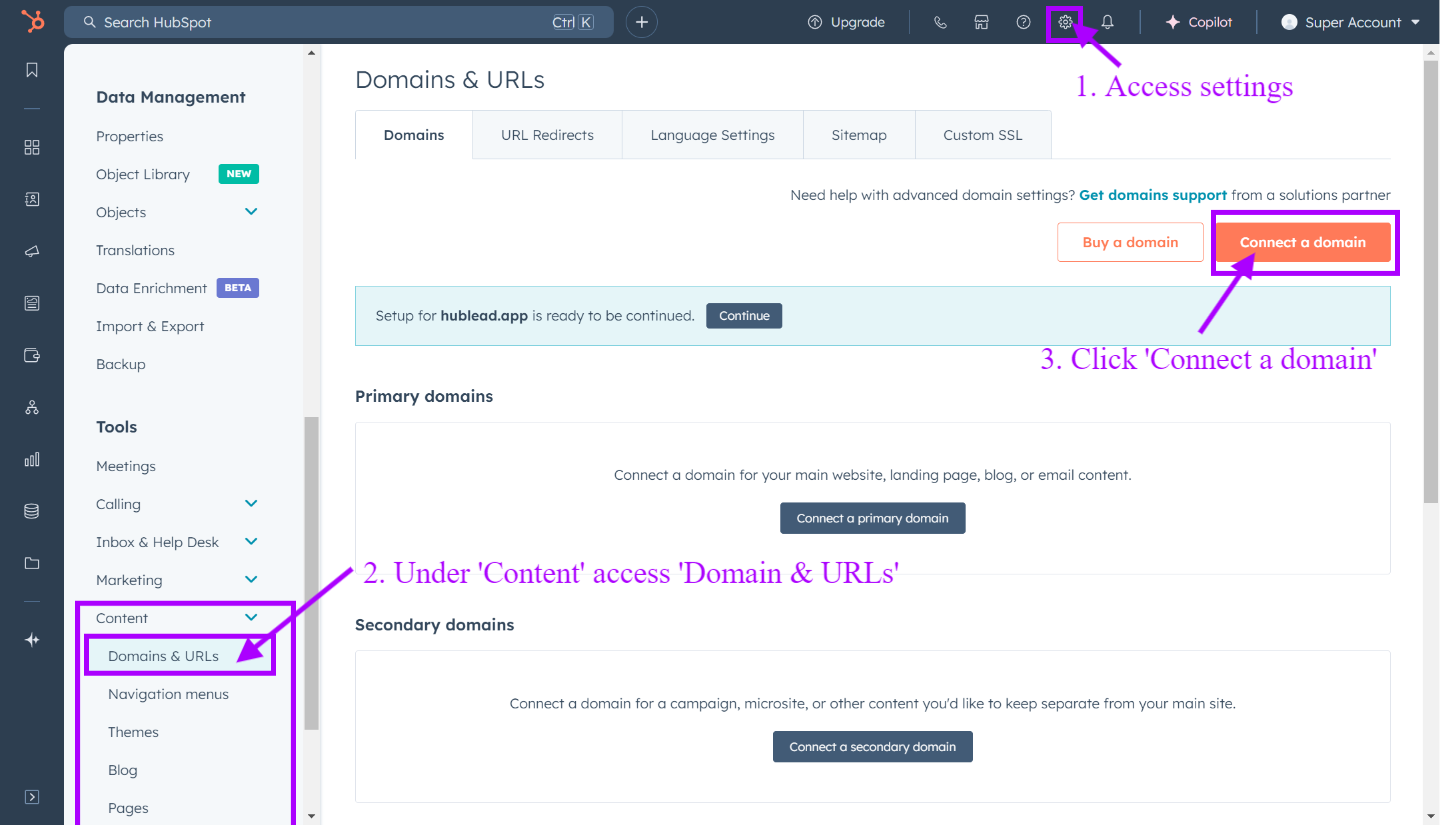
To start, you’ll need to find your way to the domain connection screen. Begin by:
- Log in to your HubSpot account.
- Click the settings icon in the top navigation bar.
- Navigate to Content > Domains & URLs.
- Click Connect a domain.
- Select Email Sending as your domain type. This step is essential for enhancing email security, protecting your brand domain, and preventing spoofing.
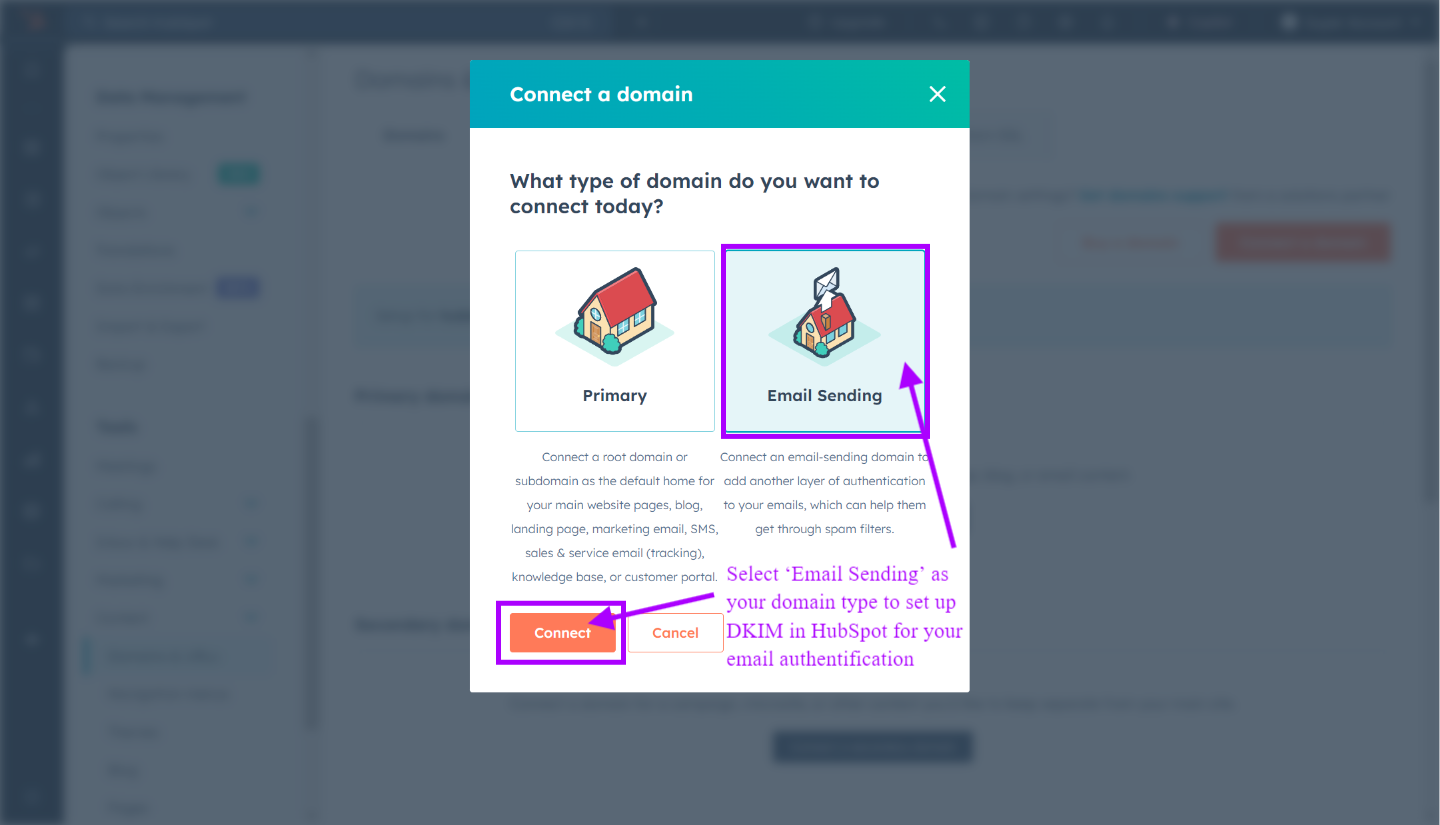
Once you’ve selected your domain, HubSpot will guide you through adding SPF and DMARC records to secure your communications.
#2 Configuring DNS Records for DKIM
Once your domain is connected, follow these steps to set up DKIM by configuring your DNS records:
- Access your DNS provider’s portal.
- Add CNAME records provided by HubSpot, ensuring each one is entered accurately.
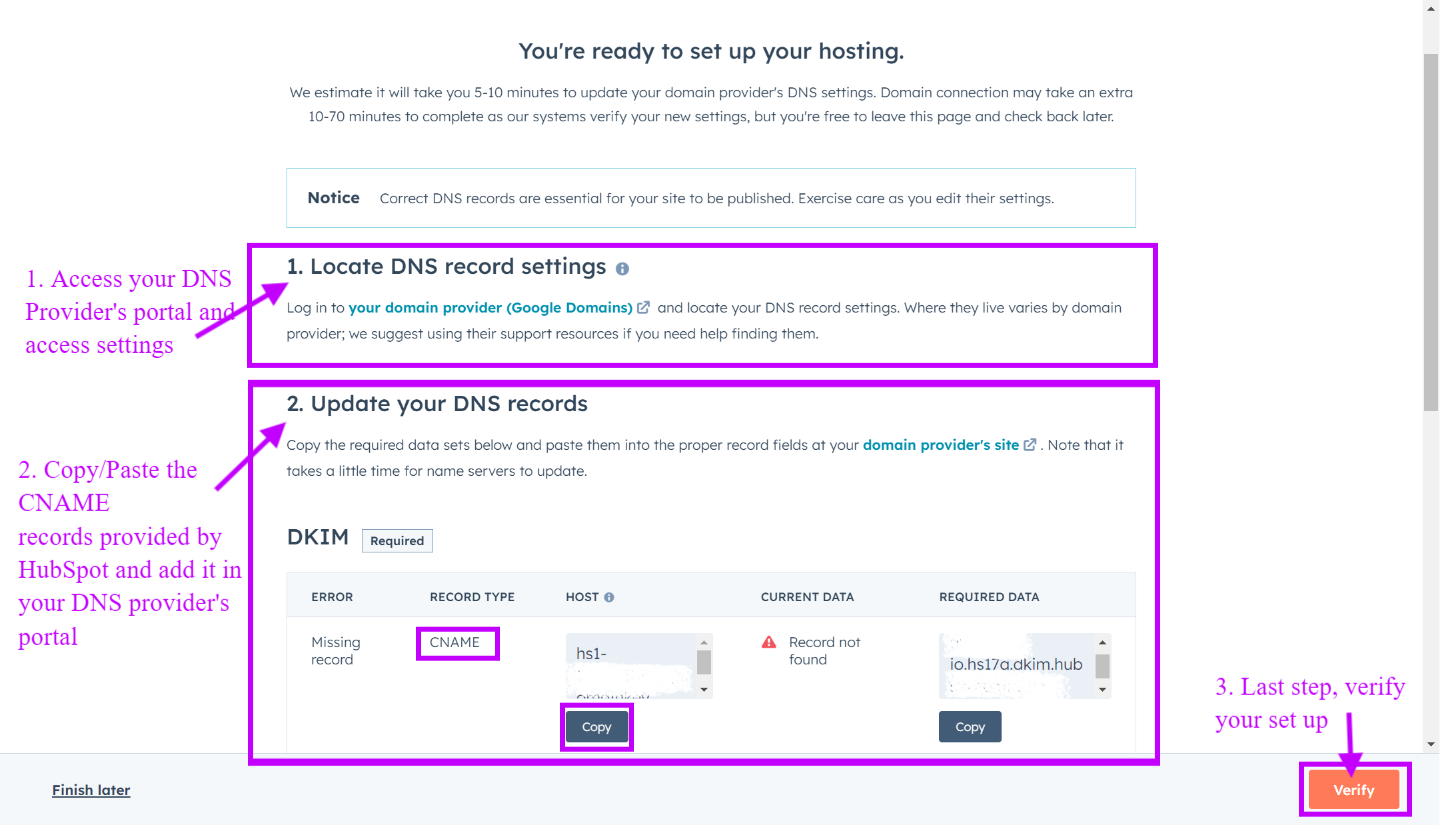
- For the final step, return to HubSpot and click 'Verify' to confirm the setup that your records were added correctly.
Good to know : Verification may take a few hours, as DNS updates can sometimes require up to 48 hours for full propagation. HubSpot will display the verification status within your domain settings.
Integrate SPF and DMARC with Your HubSpot DKIM Setup
Why SPF Matters
- Verifies Legitimacy: Confirms that emails sent on your behalf come from authorized servers.
- Reduces Spam: Helps prevent emails from being marked as spam.
Here is the process to configure SPF in HubsSpot :
- Add HubSpot’s SPF record as a TXT record in your DNS provider.

- Copy values from the Host and Required Data columns provided by HubSpot.
- Paste these values into the respective fields in your DNS.
The Role of DMARC
- Prevents Spoofing: Ensures the 'from' address matches the email source, adding an extra layer with SPF and DKIM.
- Policy Setup: Include a DMARC record in your DNS to specify how servers handle failed messages.
- Manage Security: Gain insights and control over unverified emails, enhancing trust and reliability with subscribers.
Here is the process to configure DMARC in HubSpot :
- Add a DMARC TXT record in your DNS provider.
- Copy the values from HubSpot’s Host and Required Data fields.
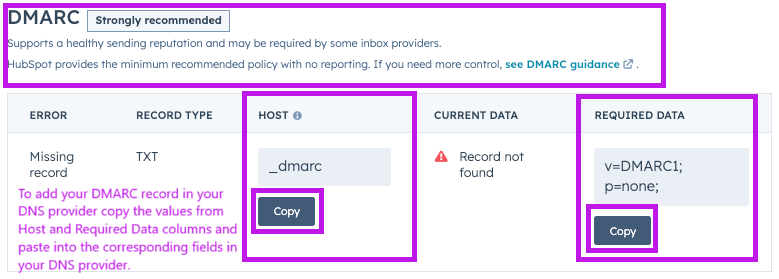
- Paste these values into the corresponding DNS fields.
Setting up SPF and DMARC alongside DKIM strengthens your email security, ensuring better deliverability and reducing spam risks.
Troubleshooting Common DKIM Setup Issues
Even well-configured setups can run into issues. Common problems might include errors in DKIM selector records or issues with the DKIM signing server.
Here are some steps to troubleshoot:
- Revisit DNS settings and check for inaccuracies.
- Ensure correct configuration by aligning settings with HubSpot’s specifications.
- Be patient as DNS changes may take several hours to propagate.
Tip: A common cause for DKIM verification errors is a missing or misconfigured private or public key. In some cases, simply regenerating the public and private key pair can resolve the issue and save time troubleshooting.
Record Invalid Error: What to Do?
Even well-configured setups can sometimes face issues like a "Record Invalid" error. Here’s how to troubleshoot:
- Verify DKIM Details: Access the management consoles of your email service provider and domain provider. Ensure the DKIM record details—Type, Name/Host, Value/Data, and TTL—are accurately configured.
- Check Specific Settings: Be mindful of settings like Cloudflare’s domain-wide CNAME flattening and proxy, which can disrupt your DKIM configuration if not set correctly.
- Save and Verify: After reconfiguring the DKIM settings, save your changes. Then, verify the setup in HubSpot to ensure everything is correctly configured and your emails are authenticated.
Optimizing Your HubSpot Email Sending Practices
Selecting the Right Email Sending Domain
Choosing the right email sending domain is key to protecting your brand’s reputation and ensuring effective communication:
- Utilize a Subdomain: Use a subdomain for email communications to safeguard your main domain’s reputation, keeping any deliverability issues separate from your primary presence.
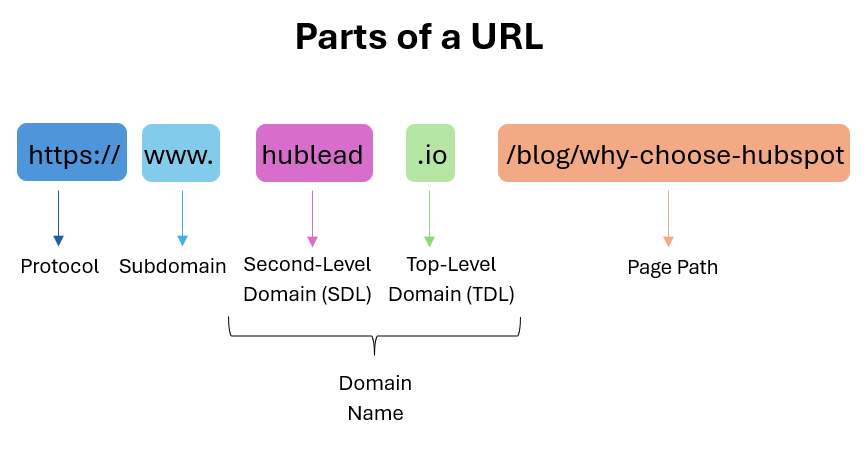
- Consistency in Domain Usage: Make sure the email-sending domain in HubSpot matches the 'From' address for consistency and authenticity.
- Consider a Secondary Domain for Specialized Campaigns: For campaigns, microsites, or unique content, connecting a secondary domain can keep these efforts distinct from your main branding.

Strategically selecting and managing your email sending domains helps craft a professional and trustworthy image that resonates with every subscriber.
Monitoring Email Performance Post-DKIM Implementation
Once DKIM is set up, regularly monitor email performance to ensure effectiveness:
- Verify DKIM Signatures: Regularly check signatures to confirm proper email authentication.
- Check SPF Records: Ensure emails are sent from authorized servers to uphold integrity.
- Monitor Feedback Loops and DMARC Reports: Review these to understand email processing and identify any authentication issues.
Consistent monitoring and adjustments will help maintain a strong, trustworthy email authentication system.
Frequently Asked Questions
How do I find my DKIM key in HubSpot?
To locate your DKIM key in HubSpot, log into your HubSpot account and navigate to Settings > Content > Domains & URLs. Select your connected email sending domain, and HubSpot will display the DKIM record information required to configure your DNS.
Can I use DKIM without SPF for HubSpot emails?
While DKIM can function independently, it’s highly recommended to use both DKIM and SPF records to maximize email deliverability and protect your domain from spoofing.
Do I need DKIM to set up DMARC in HubSpot?
No, DMARC can work with either DKIM or SPF alone. However, using both DKIM and SPF with DMARC provides added layers of authentication, enhancing email security and ensuring alignment between your domain policies and email practices.
Who provides the DKIM key when using HubSpot?
For HubSpot emails, the DKIM key is generated by HubSpot and provided to you within the platform. You can find it in Settings > Domains & URLs under your connected email sending domain.
Is the DKIM record a CNAME or TXT record in HubSpot?
In HubSpot, DKIM records are configured as CNAME records. These CNAME entries point to HubSpot’s DKIM keys, allowing recipient servers to verify your email’s authenticity using public keys stored in HubSpot’s DNS records.


