Mastering Lead Form Routing in HubSpot
Speed up your sales process with smart lead form routing in HubSpot. Learn how top teams automate lead assignment and improve conversion rates.
When a sales-ready lead submits a form on your website, your marketing and sales teams need a system to immediately route that lead to the right person. Any delay, or worse, assigning leads to the wrong rep, can cost you revenue and damage the customer experience.
That’s where lead form routing comes in.
Lead form routing in HubSpot ensures every inbound lead is automatically assigned to the right rep or team based on predefined criteria. Instead of manually reviewing submissions, your team leverages HubSpot workflows to streamline lead assignment, increase response speed, and avoid missed opportunities.
This guide breaks down:
- What lead form routing is and why it matters
- How to set up automated lead routing using HubSpot workflows
- Best practices for assigning leads based on form type, company size, or lead score
- Advanced strategies for routing by account ownership, deal value, or territory
- Common pitfalls and how to avoid them
By the end, you'll have a step-by-step framework to build an effective lead routing system inside your HubSpot account, so your sales team connects with the right prospects, faster.
Why Lead Form Routing HubSpot matters
Lead form routing is the process of automatically distributing new leads to the most appropriate sales representatives using rules based on form submissions and lead data.
In HubSpot, this is done through automated lead routing powered by workflows. As soon as a lead completes a form, enrollment triggers activate a series of logic-based steps that assign the lead to the right person, update their status, and even create follow-up tasks.
Here’s why it matters:
- Speed-to-lead wins deals. Routing leads instantly improves conversion by reducing time-to-contact.
- Consistency and accuracy. Workflows prevent human error and ensure every lead follows a defined process.
- Alignment across teams. Marketing hands off only qualified leads, and sales receives leads that meet expectations.
- Scalability. As your team and lead volume grow, a well-built lead routing process ensures nothing falls through the cracks.
For example:
- A small company size might route to your SDR team for qualification.
- A high-value enterprise lead with a large deal size may go straight to an Account Executive.
- Leads expressing interest in a specific product can be assigned to product specialists.
With HubSpot lead routing, you can build workflows that distribute leads by geography, lead score, industry, form type, and more. Whether you’re using round-robin assignment, account-based logic, or segment-specific owners, HubSpot’s routing tools help you send every lead to the right rep, fast.
Next, we’ll walk through how to set up lead routing workflows in HubSpot, step by step.
Understanding Lead Routing
Lead routing is a critical component of any sales strategy, ensuring that the right prospects reach the right representative at the right time. It involves automatically directing inbound leads to the most suitable team members, streamlining the sales process, and reducing manual errors. Effective lead routing can help businesses save time and resources, increase conversion rates, and ultimately drive revenue growth. By implementing a robust lead routing process, companies can ensure that their sales teams are always working on the most promising leads, thereby maximizing their chances of closing deals.
What is Lead Assignment?
Lead assignment is the process of automatically assigning leads across a team, such as a sales team or agency success team. It is a crucial step in the lead routing process, ensuring that leads are assigned to the right person at the right time. Lead assignment can be based on various criteria, including industry, job title, company size, or location. By automatically assigning leads, businesses can ensure a swift and efficient response, improving the chances of converting leads into customers. This automated approach not only saves time but also ensures that leads are handled by the most appropriate sales rep, enhancing the overall efficiency of the sales team.
How to Set Up Automated Lead Routing
To build automated lead routing inside your HubSpot account, you’ll use HubSpot workflows, available on Professional and Enterprise tiers. These allow you to define rules that trigger lead assignment based on form submissions, company size, lead score, and more.
Here’s a simple step-by-step guide to setting up an effective lead routing workflow:
Step 1: Access HubSpot Workflows
To start, go to Automation > Workflows in your HubSpot account. This is where you’ll create your lead routing workflows and define logic for assigning leads automatically.

💡 Pro Tip: Make sure you have admin permissions to access HubSpot workflows and manage automation settings.
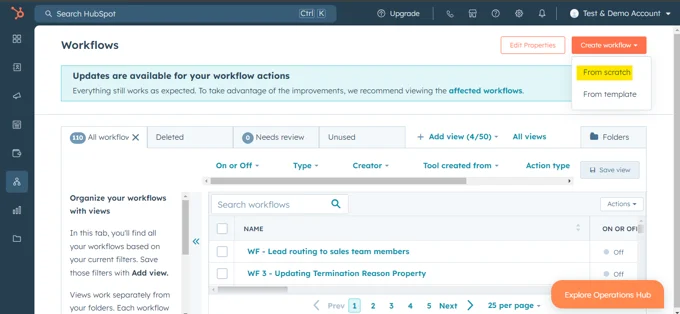
Step 2: Create a New Workflow
Click Create workflow, then select From scratch → Contact-based workflow. Since you're routing leads generated from form submissions, you'll want to start from a blank canvas.
Name it clearly e.g., “Lead Form Routing – Demo Requests.”
Step 3: Set Enrollment Triggers (Form Submissions)
Choose Form submission as your enrollment trigger. This tells HubSpot when to enroll a contact in the workflow.

Example:
Form is "Request a Demo" OR "Contact Sales"
You can also include multiple specific forms to centralize lead flow from different sources. Once set, click Apply and Save.
Step 4: Qualify Leads with If/Then Branches
Not all inbound leads are sales-ready. Use If/Then branches to qualify leads before assigning them.
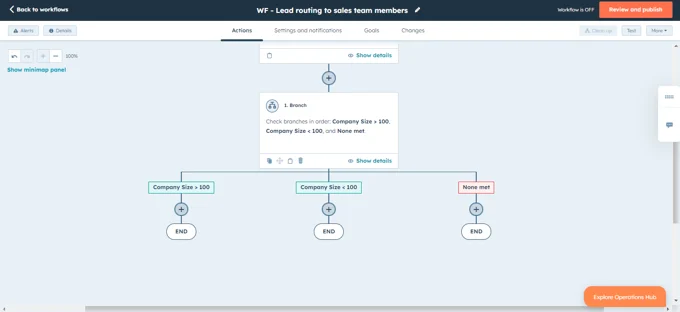
Example:
If Company size > 50 employees → Continue
Else → Route to nurture automation
This helps ensure only sales qualified leads get passed to your sales team, improving lead management and rep efficiency.
Step 5: Segment Leads by Region, Product, or Deal Value (Optional)
To build a more strategic lead routing process, add additional branches based on:
- Territory (e.g., country or region)
- Product interest
- Lead source
- Deal value
- Niche industry
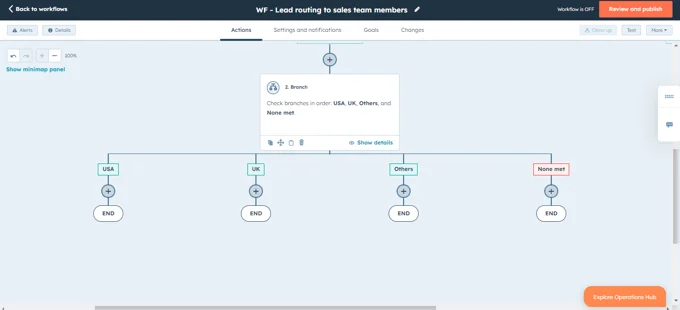
This segmentation is key for routing leads based on their specific criteria, enabling a proper sales model tailored to your GTM motion.
Step 6: Assign Leads to the Right Sales Rep
Once leads meet your lead routing criteria, assign them using either:
- Set contact owner – Assigns to a specific sales rep or account executive
- Rotate record to owner – Uses round robin assignment to evenly distribute leads among a team

💡 For teams sharing leads, use lead rotations via “Rotate record.” You can also choose to overwrite lead rotations for reassignments, useful when leads re-engage or change status.
Optional: Add a Create task action or internal email to alert the assigned rep for immediate follow-up.
Step 7: Finalize and Activate
Once your routing logic is built, review it carefully. Make sure:
- All routing paths end with a clear lead assignment
- Qualified leads are routed to the right person
- Unqualified leads are either nurtured or paused
Click Review and Activate to go live. Now, when leads enter your funnel via form submissions, your workflow will handle automatically assigning leads based on your strategy.

Effective Lead Routing
Creating a workflow is just the start. To unlock the full potential of lead form routing in HubSpot, your marketing and sales teams need a clear, scalable strategy. Here’s how to optimize your lead routing workflow for better performance and smoother lead management:
1. Keep Your Lead Assignment Rules Simple
Avoid overcomplicating your lead routing process. Focus on a few key criteria, such as region, company size, or product interest, to ensure easy maintenance and fewer errors. If your sales process is complex, consider splitting logic across different lead routing processes or using dedicated lead routing software.
2. Prioritize Accuracy Over Speed
Fast response is critical, but only if the lead reaches the right sales reps. Use HubSpot workflows to route based on industry, territory, or lead type before applying lead rotations via round robin assignment. This ensures leads talk to reps who understand their context.
3. Use Form Context to Route Based on Intent
Not all form submissions signal the same intent:
- High-intent forms (e.g., “Request a Demo”) → Route to sales representatives
- Low-intent forms (e.g., newsletter) → Send to nurture automation
- Specific forms → Assign based on product interest or deal value
Tailor routing logic to match lead intent and ensure sales ready leads get priority.
4. Route by Lead Source and Campaigns
Incorporate lead source, campaign UTM tags, or corresponding HubSpot properties into your routing leads strategy. Assign partner-sourced leads to partner owners or campaign leads to aligned reps. This enhances the customer experience by aligning follow-up with context.
5. Use Lead Scoring to Qualify Leads Automatically
A lead score helps you qualify leads based on engagement and fit. Use scoring thresholds (e.g., score ≥ 50) as enrollment triggers in your workflow to filter sales qualified leads from broader lead generation efforts.
6. Match Leads to Existing Account Owners
If a lead is tied to an existing customer or known account, use account based matching to assign them to the current contact owner. In HubSpot, this may require a workflow check:
If Contact Owner exists → Assign to that owner; else → rotate record
This approach strengthens relationships and avoids rep confusion.
7. Fast-Track High-Value Leads
Use company size, seniority, or potential deal value to flag high-priority leads. Route these to experienced account executives or senior reps for immediate attention. This tiered model is common in mature lead routing models.
8. Factor in Time Zones and Rep Availability
If you're global, use region-based routing to connect leads with reps in their time zones. You can also build an “off-hours” branch to route to an on-call team, ensuring round-the-clock coverage.
9. Review and Optimize Regularly
Don’t “set and forget.” Review your HubSpot lead routing every quarter:
- Are leads reaching the right reps?
- Are lead assignments balanced?
- Are you getting conversions in every region?
Use performance data and routing logs to iterate and improve.
By applying these lead routing strategies, you’ll create a scalable system to manage lead routing across your sales teams, enhance lead distribution, and accelerate conversions.
Next, we’ll dive into lead assignment mechanics, like when to rotate record versus assign directly, and how to design the ideal distribution flow for your team structure.
Advanced Lead Routing Strategies
If your business handles high lead volume, multiple segments, or complex territory structures, it’s time to go beyond basic HubSpot workflows. Mature companies require flexible, scalable lead routing strategies to improve speed, accuracy, and conversion.
Here’s how to build advanced lead routing in HubSpot:
1. Align Across the GTM Team
Effective lead routing involves more than sales. Your marketing and sales teams, along with RevOps and success, should define shared rules for lead qualification, MQL/SQL definitions, and assignment criteria.
Host regular alignment sessions to review lead flow, pipeline feedback, and update your lead routing workflow accordingly.
2. Use Account-Based Lead Routing
For account based matching, route leads based on existing company ownership. If a sales rep already owns a company in HubSpot, any new contact from that domain should go to them.
Since HubSpot lead routing doesn't do this natively, set up logic in workflows:
If company domain matches existing account with owner → assign to that owner; else → rotate record
Tools like RevenueHero or Insycle can automate this more robustly.
3. Add a Routing Log for Transparency
HubSpot lacks a native routing log, so advanced teams build their own. Add a custom contact property like “Routing History” and use workflows to update it with a note each time the lead is reassigned (e.g., “Apr 2025: Routed to AE - UK”).
Pair this with reports on:
- Lead volume per rep
- Time to first touch
- Conversion rate by lead source or territory
Use this data to fine-tune lead distribution and manage lead routing dynamically.
4. Handle Reassignments with Overwrite Logic
Sometimes, assigned leads stall. Use a time-based workflow to detect when no activity has occurred within a set window (e.g., 24 hours), and re-route the lead using overwrite lead rotations.
In your workflow:
If no activity for 24h → Rotate record to owner (overwrite enabled)
This ensures your sales ready leads don’t sit idle and your sales process stays responsive.
5. Segment Workflows by GTM Model
Rather than stuffing all logic into one workflow, create dedicated workflows for different motions:
- One for inbound from product A
- One for partner leads
- One for enterprise requests or niche industry segments
Use specific enrollment triggers (like “submitted form A”) to ensure each lead routing process is self-contained and optimized.
6. Enable Follow-the-Sun Lead Routing
If your sales teams span global time zones, consider a lead routing strategy based on business hours.
Example:
Route APAC leads to APAC reps during their hours; route to EMEA or US during off-hours
This keeps response time short, no matter when leads enter your funnel.
7. Combine Routing with Scheduling
Speed up conversions by allowing form submissions to trigger instant meeting booking. HubSpot now supports redirect to meeting link (beta). Alternatively, use tools like Chili Piper or RevenueHero to automatically assign a rep and offer immediate scheduling.
This turns a lead into a booked meeting within seconds, maximizing conversion from sales qualified leads.
8. Use Lead Routing Software for Complex Logic
When HubSpot workflows can’t scale to your needs, think weighted lead rotations, multiple conditions, or logging, consider dedicated lead routing software.
Tools like:
- RevenueHero (weighted routing, instant booking)
- Insycle (data cleanup + routing logic)
These tools automate automatically assigning leads based on flexible business logic and API connections to your HubSpot account. Worth the investment if you're scaling aggressively.
HubSpot Lead Routing Features
HubSpot offers a range of features to facilitate and manage lead routing, including workflows, lead scoring, and assignment triggers. These features enable businesses to automate the lead routing process, ensuring that leads are assigned to the right team members quickly and accurately. With HubSpot, you can create custom workflows that define how leads are qualified, segmented, and assigned, making the lead management process seamless and efficient. By leveraging these tools, businesses can ensure that their lead routing strategies are both effective and scalable, supporting their growth and sales objectives.
HubSpot Lead Routing Capabilities
HubSpot’s lead routing capabilities include:
- Automated lead assignment: Assign leads to team members based on predefined criteria, such as industry or job title. This ensures that leads are handled by the most suitable sales rep, improving the chances of conversion.
- Lead scoring: Assign a score to leads based on their behavior, demographics, and firmographics. This helps in prioritizing leads and focusing efforts on the most promising prospects.
- Assignment triggers: Set up triggers to assign leads to team members based on specific actions, such as form submissions or email opens. This ensures timely follow-up and enhances the lead management process.
- Workflows: Create custom workflows to manage the lead routing process, including lead qualification, segmentation, and assignment. These workflows help in automating the entire lead routing process, making it more efficient and error-free.
Company Size and Lead Routing
Company size can play a significant role in lead routing, as larger companies may require more complex routing strategies to manage multiple teams and territories. In contrast, smaller companies may require simpler routing strategies to manage a smaller sales team. Regardless of company size, effective lead routing is crucial to ensuring that leads are assigned to the right team members quickly and accurately. For larger organizations, mature lead routing models and advanced lead routing software may be necessary to handle the volume and complexity of leads. Smaller companies, on the other hand, can benefit from streamlined lead routing processes that ensure every lead is promptly and appropriately handled by the sales team.
Takeaway
Advanced lead form routing in HubSpot requires cross-functional alignment, custom workflow logic, and sometimes external tools. Mature teams don’t just build workflows, they iterate, analyze, and adapt.
With these strategies in place, you’ll:
- Route more leads to the right person
- Improve your lead management efficiency
- Support a proper sales model that aligns with GTM strategy
- Ensure fast, accurate follow-up from your sales representatives
Next, we’ll break down the mechanics of lead assignment, from round robin assignment to ownership rules, to complete your lead routing system.
Frequently Asked Questions
What are the best strategies for routing leads in HubSpot?
HubSpot’s native lead routing workflow features are powerful, but if you need more flexibility, like weighted lead rotations, advanced account based matching, or a visual routing log, dedicated lead routing software like RevenueHero or Insycle can help. These tools integrate with your HubSpot account and allow for more complex rules across different lead routing processes, especially in high-volume or multi-segment environments.
Can I manage lead reassignments and overwrite logic in HubSpot?
Yes, you can manage lead routing reassignments using HubSpot workflows. To re-route unresponsive leads, use a time-based workflow to detect inactivity and trigger a new assignment using overwrite lead rotations. This is especially useful if a sales rep hasn't followed up within a certain time frame. You can also add a custom routing log property to track changes in lead ownership and maintain visibility.
What are the best strategies for routing leads in HubSpot?
Some of the most effective lead routing strategies include:
- Using lead score to qualify leads before assignment
- Routing by territory, industry, or product interest
- Prioritizing high-value deals and key accounts
- Implementing account based matching to keep ownership consistent
- Splitting workflows by niche industry or GTM model
These approaches help sales teams focus on the right leads while enabling mature lead routing models that scale with growth.
How do I set up an automated lead routing workflow in HubSpot?
To set up automated lead routing in HubSpot, go to Automation > Workflows, then create a workflow based on form submissions or other enrollment triggers. Use if/then branches to check lead routing criteria like deal value, company size, or lead source, then assign leads using either rotate record (for round robin assignment) or by setting the contact owner manually. This lets you route leads instantly while maintaining alignment across your marketing and sales teams.
What is lead form routing in HubSpot and why is it important?
Lead form routing in HubSpot is the process of automatically assigning leads to the right sales representatives based on specific criteria—such as form submissions, company size, product interest, or lead score. It ensures a smooth lead routing process, so every sales ready lead is handed off to the right rep, fast. This improves lead management, accelerates response times, and boosts your sales process efficiency.